Pivot appearance
Pivot markers show the server-supplied navigation anchor in its bound viewport. These are SDK presentation recommendations, not wire-protocol requirements. For diagnostic overlays, follow the diagnostic rendering contract.
Pivot marker appearance
Section titled “Pivot marker appearance”Use a screen-facing filled lime-green disc with a black rim for camera and object pivots. This page is the shared SDK guidance for pivot presentation, including depth behavior and lifecycle; these are not wire-protocol fields. Pose application must not depend on the ability to render the marker.
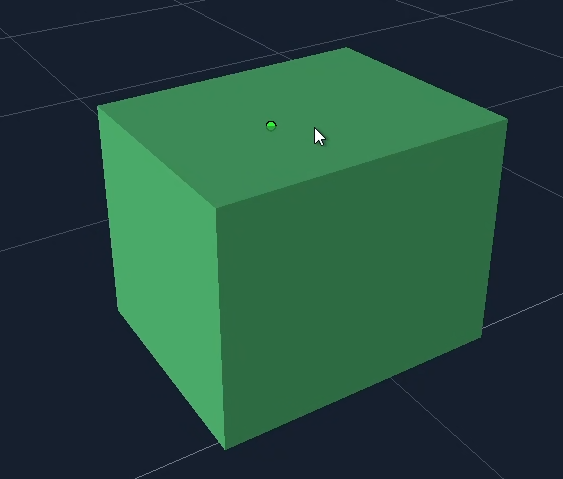
The cube’s surface partially occludes this pivot marker. The exposed portion remains opaque, while the portion behind the surface is faintly visible. Depth testing applies to each fragment of the disc and rim, so the marker can intersect geometry without fading as a whole.
| Property | Recommended appearance |
|---|---|
| Fill | Lime green, RGB (0, 255, 0); opaque where visible |
| Rim | Black, RGB (0, 0, 0); opaque where visible |
| Green radius | 4 logical display pixels (8-pixel diameter) |
| Outer black radius | Approximately 5.5 logical pixels (11-pixel diameter) |
| Shape | Filled circular disc, camera-facing; use antialiasing or at least 32 segments |
| Placement | Centered at the projected server-supplied world point, without an offset |
| Depth | Unlit and scene-depth-tested: opaque where visible, approximately 20–25% opacity behind geometry; never write scene depth |
Prefer per-fragment depth testing so scene geometry can intersect the marker
naturally. Draw visible fragments with full opacity and occluded fragments with
reduced opacity, for example with complementary LESS_EQUAL and GREATER
passes or the host’s native show-through effect. Apply the same opacity to the
fill and rim. Do not fade the entire marker based only on whether its center is
occluded, and do not move the marker toward the camera to avoid intersections.
Use a separate annulus or equivalent compositing so the translucent fill does
not blend over a second black disc at the same pixels. Restore graphics state
after drawing.
If the host cannot expose scene depth, an always-visible opaque overlay is an acceptable fallback; document that limitation. The Onshape DOM integration uses this fallback. The C# raylib, C++ OpenGL, Python Panda3D, and TypeScript Three.js reference apps implement the preferred depth-tested show-through behavior.
Keep its apparent size constant when zooming or changing projection. Apply the display’s DPI scale once: marker dimensions and viewport sample positions are logical pixels, not framebuffer pixels. Hide points outside the viewport or behind/outside the camera’s clipping range. Clip overlays to their bound viewport.
Camera and object markers have the same appearance. Keep their lifetimes separate;
clear each when its SDK pivot callback supplies no point. Cancellation, disconnect,
gesture end (motion_end), target replacement and unload must remove stale markers. A coincident pair may
appear as one disc; do not move either point to separate them. Markers remain
visible with diagnostics disabled and stay outside picking, bounds, snapping,
undo and saved content.
Check a marker crossing a surface: its exposed portion should stay opaque while its occluded portion remains faintly visible. Also check fully exposed and fully occluded markers, clipping, zoom, both projections, display scaling and split views. An overlay-only fallback should remain opaque and retain the same size, color, placement and cleanup behavior.
Diagnostic pick samples are labeled crosshairs, not pivot discs. Their palette, geometry and labels come from the collector under the diagnostic rendering contract.